Shopify
We have simplified the process to implement MyRegistry Gift list into your Shopify Store

App Overview
This app allows MyRegistry partners to integrate powerful features for a seamless universal gift registry experience
Add any product directly to MyRegistry gift list
Easily add the Gift Registry Page to your store
Automatically marks items as purchased on gift lists
Pre-fills gift recipient's address during checkout
Links a MyRegistry signup directly to a Shopify customer profile
Displays a Return to Registry link on the Shopify cart page
📲 Get the App
Use the private link provided by the MyRegistry team to get the Advanced MyRegistry Functions App.
🔴 This is a private app and is not publicly listed on the Shopify App Store.
If you don't already have the install link:
-
New MyRegistry partners can request access here
-
Existing MyRegistry partners should email [email protected] to receive the installation link
 Important: Click the link to begin installation and follow the instructions
Prerequisites
 Before getting started, please ensure the following are in place:
 You are an active MyRegistry Partner and have the Sitekey
 You have a Shopify Plus plan to access checkout-based features (e.g. Shipping Auto-Populate)
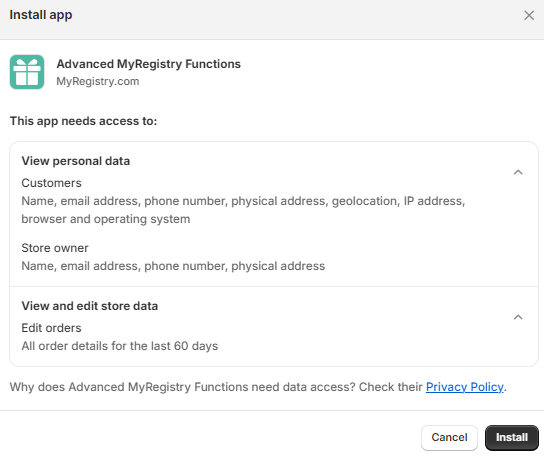
 Grant the App the required access while installation
Feature Installations
Once you have installed the app successfully, please proceed with installing individual features per your plan
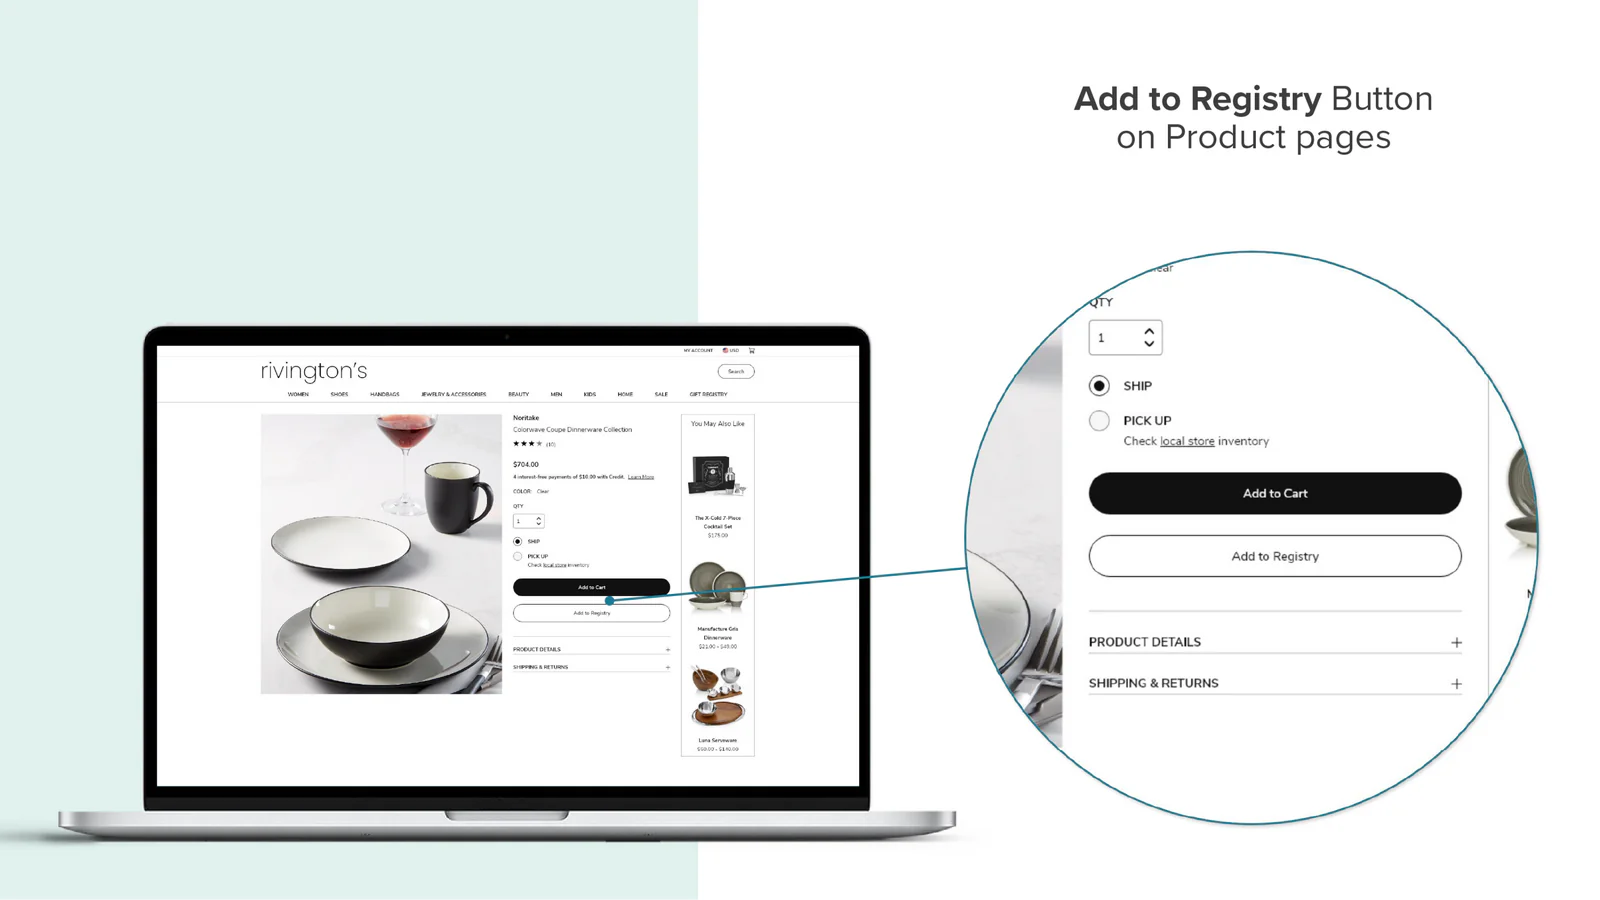
Add to Registry Button
Lets customers add products to their gift registry directly from product detail pages and even create a giftlist account if needed
Steps to add 'Add to Registry' button
Inside Shopify admin panel
- Navigate to
Sales Channel👉Online Stores👉Themes👉Customize

- You will be redirected to the theme editor. In the header:
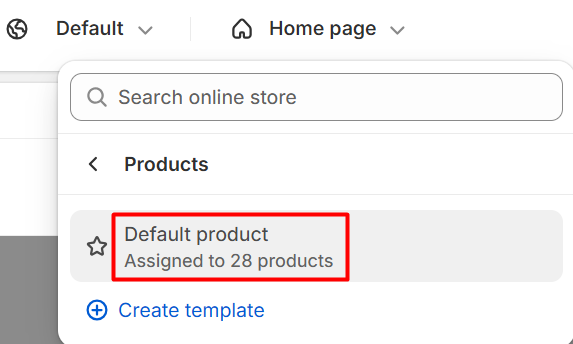
Click Home Page👉Products👉Default Product / Product Information (Name can differ)
- On the left panel , Click on the
(+) iconto add an app block and SelectApps👉Add to Registry
- Click
Save
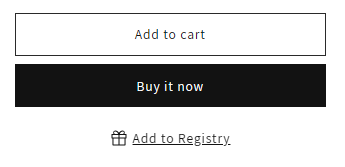
As we placed the block below the Buy Button, the Add to Registry button appears:
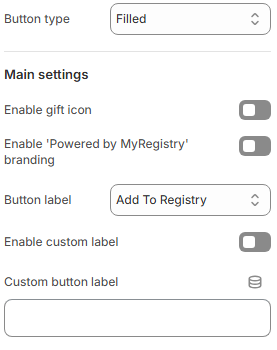
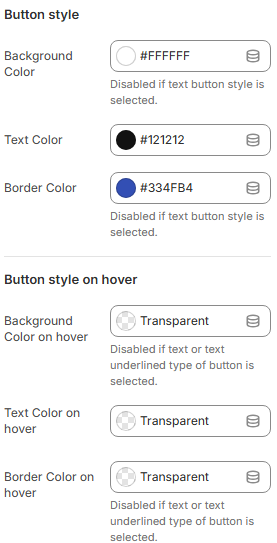
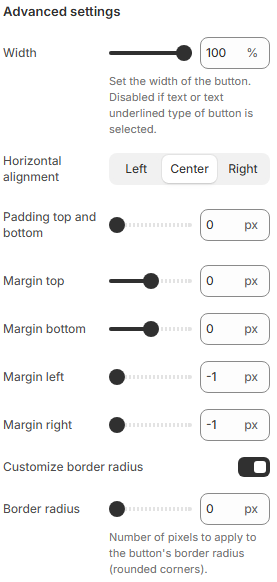
Once the Add to Registry block has been successfully added, you can customize the look and feel of the button to match your store's branding
Customize the button
To match your brand aesthetics, use the built-in customization panel:
Navigate to: Online Store 👉 Themes 👉 Customize 👉 Product Info 👉 Add to Registry Block
Custom CSS (Optional)
.myregistry-add-button {
  background-color: #f7f7f7;
  border-radius: 6px;
}
💡 LeaveCustom CSS Classnames blank unless referencing theme-specific classes
✅ Click Save once design is finalized.
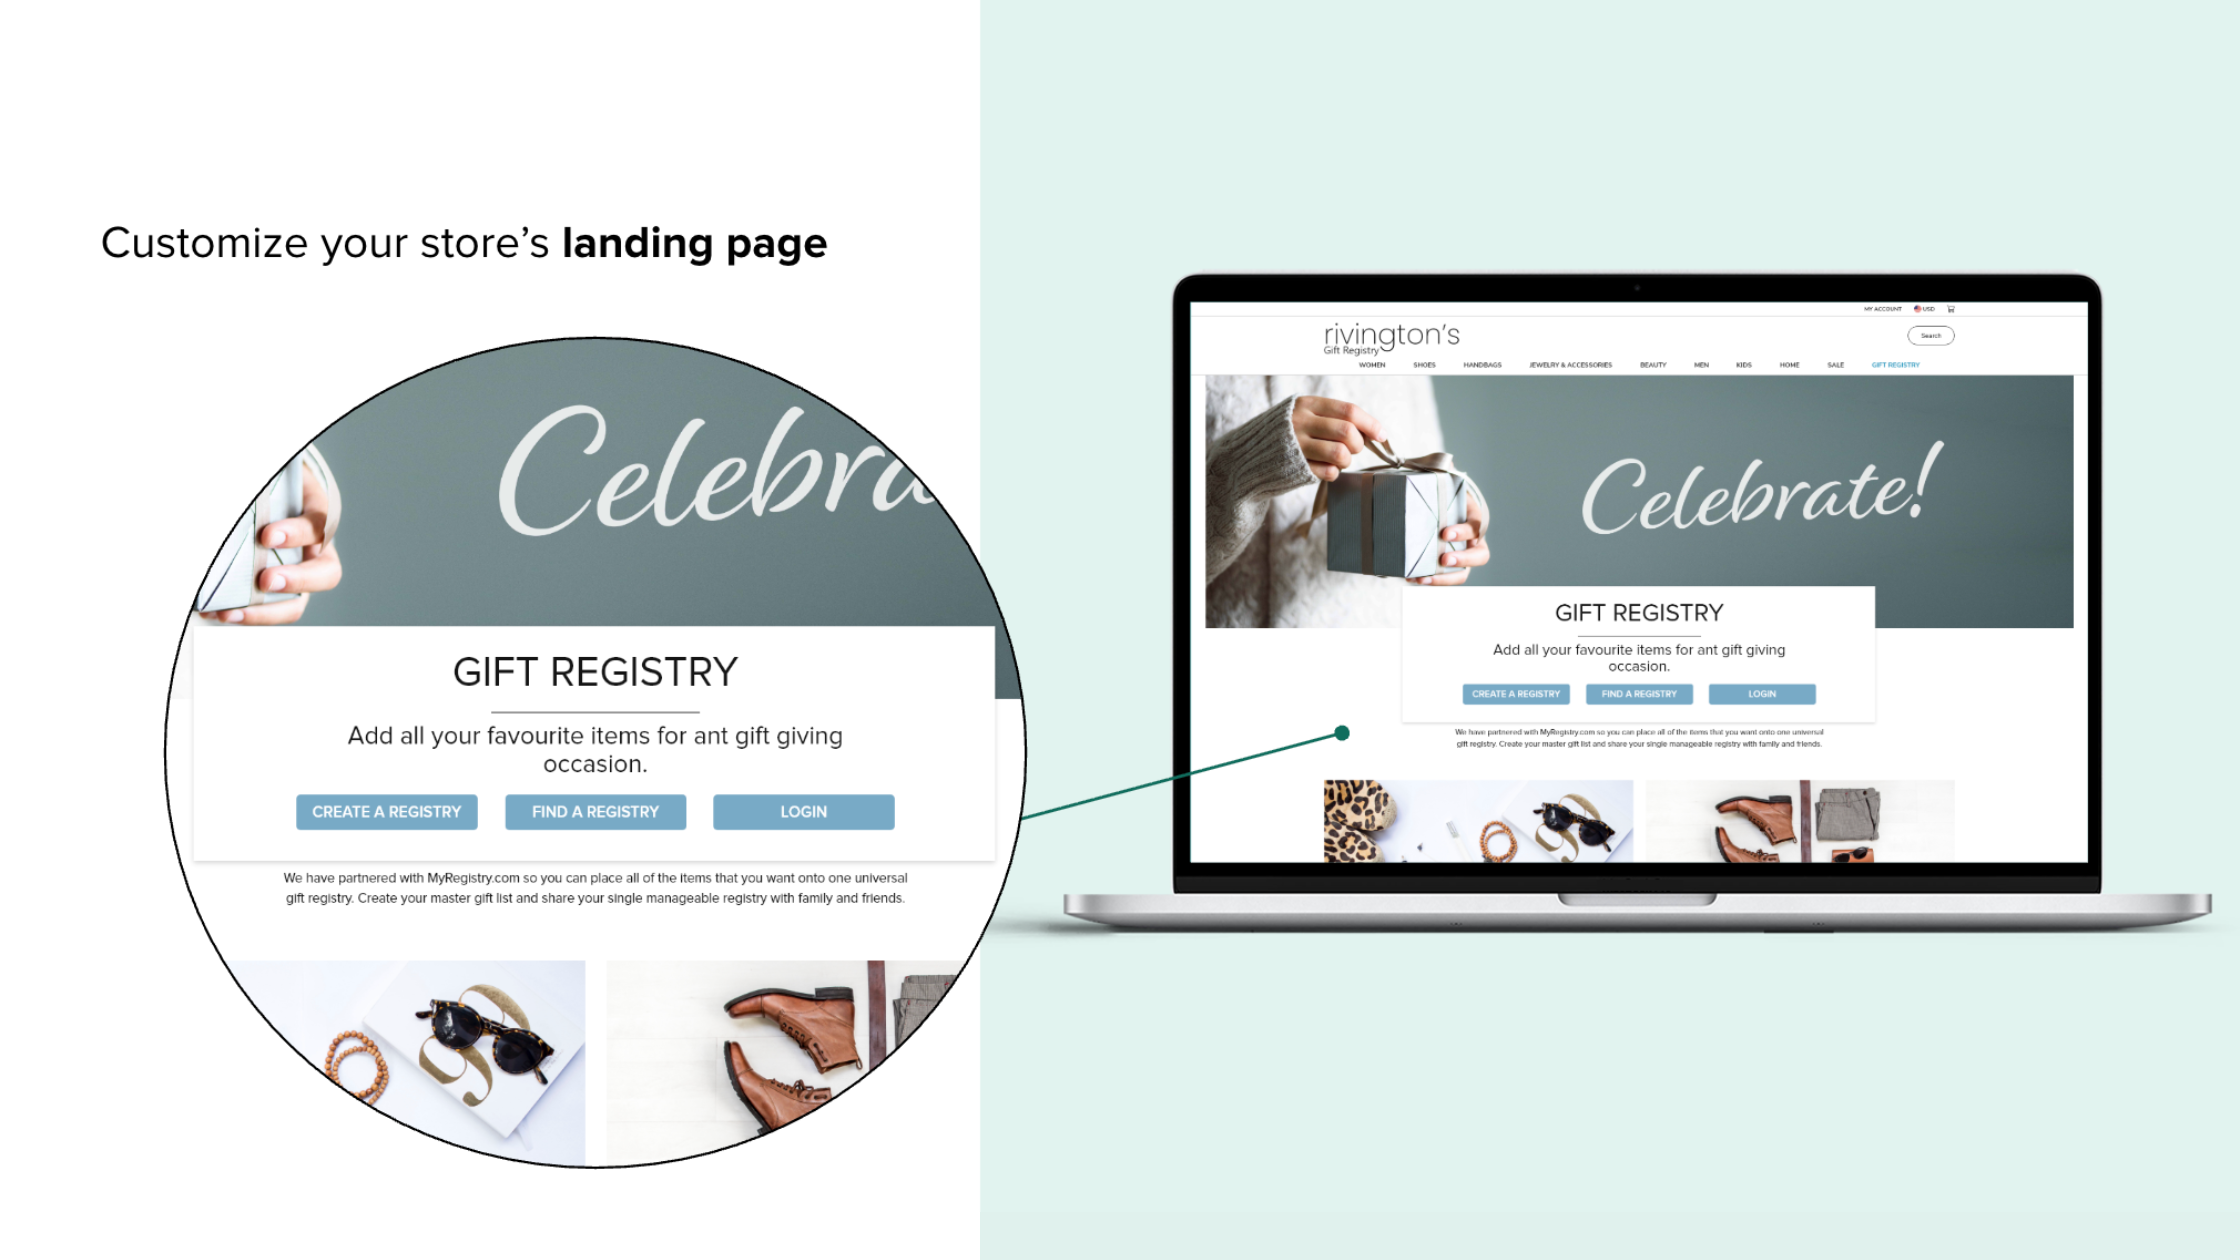
Landing Page
Add the Gift Registry Page app block to your store’s landing page and customize it for unique experience
Steps to configure Landing Page
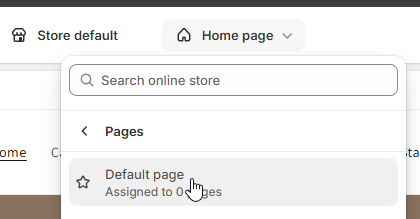
Add a customizable Gift Registry page to your online store, Navigate to Your Theme Editor
Inside Shopify admin panel
- Go to Sales
Channel👉Online Store👉Themes, then clickCustomizeon the theme you want to edit

- Open a Non-Product Page Template Once in the Theme Editor, use the header dropdown to switch to any page template except the Product page
Note: The Gift Registry Page app block cannot be installed on Product pages
- Add the
App BlockIn the left sidebar, click the ( + ) Add block button
Select Apps 👉 Gift Registry Page from the list of available app blocks
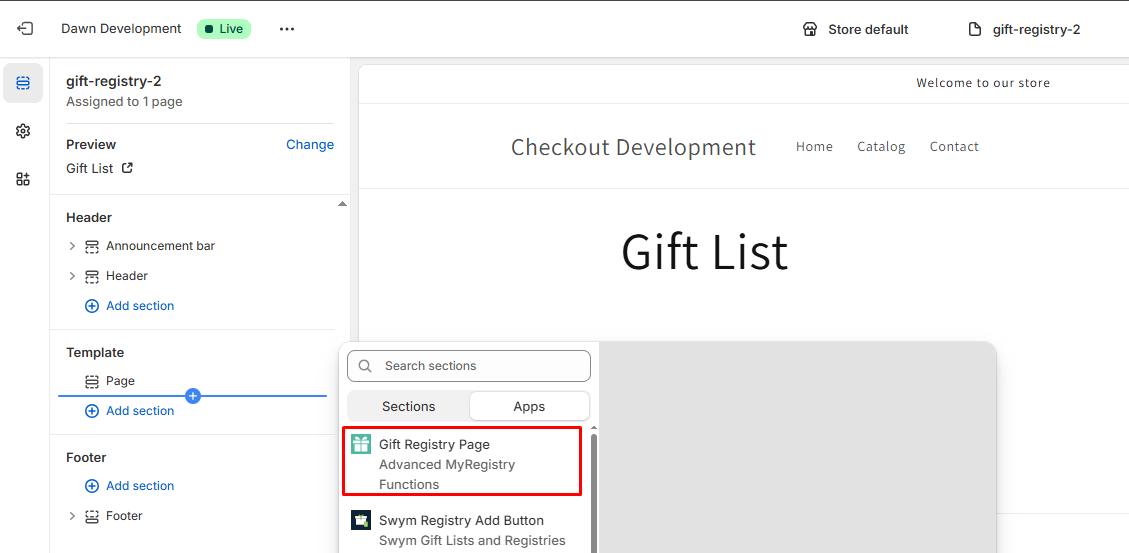
- Click
Save
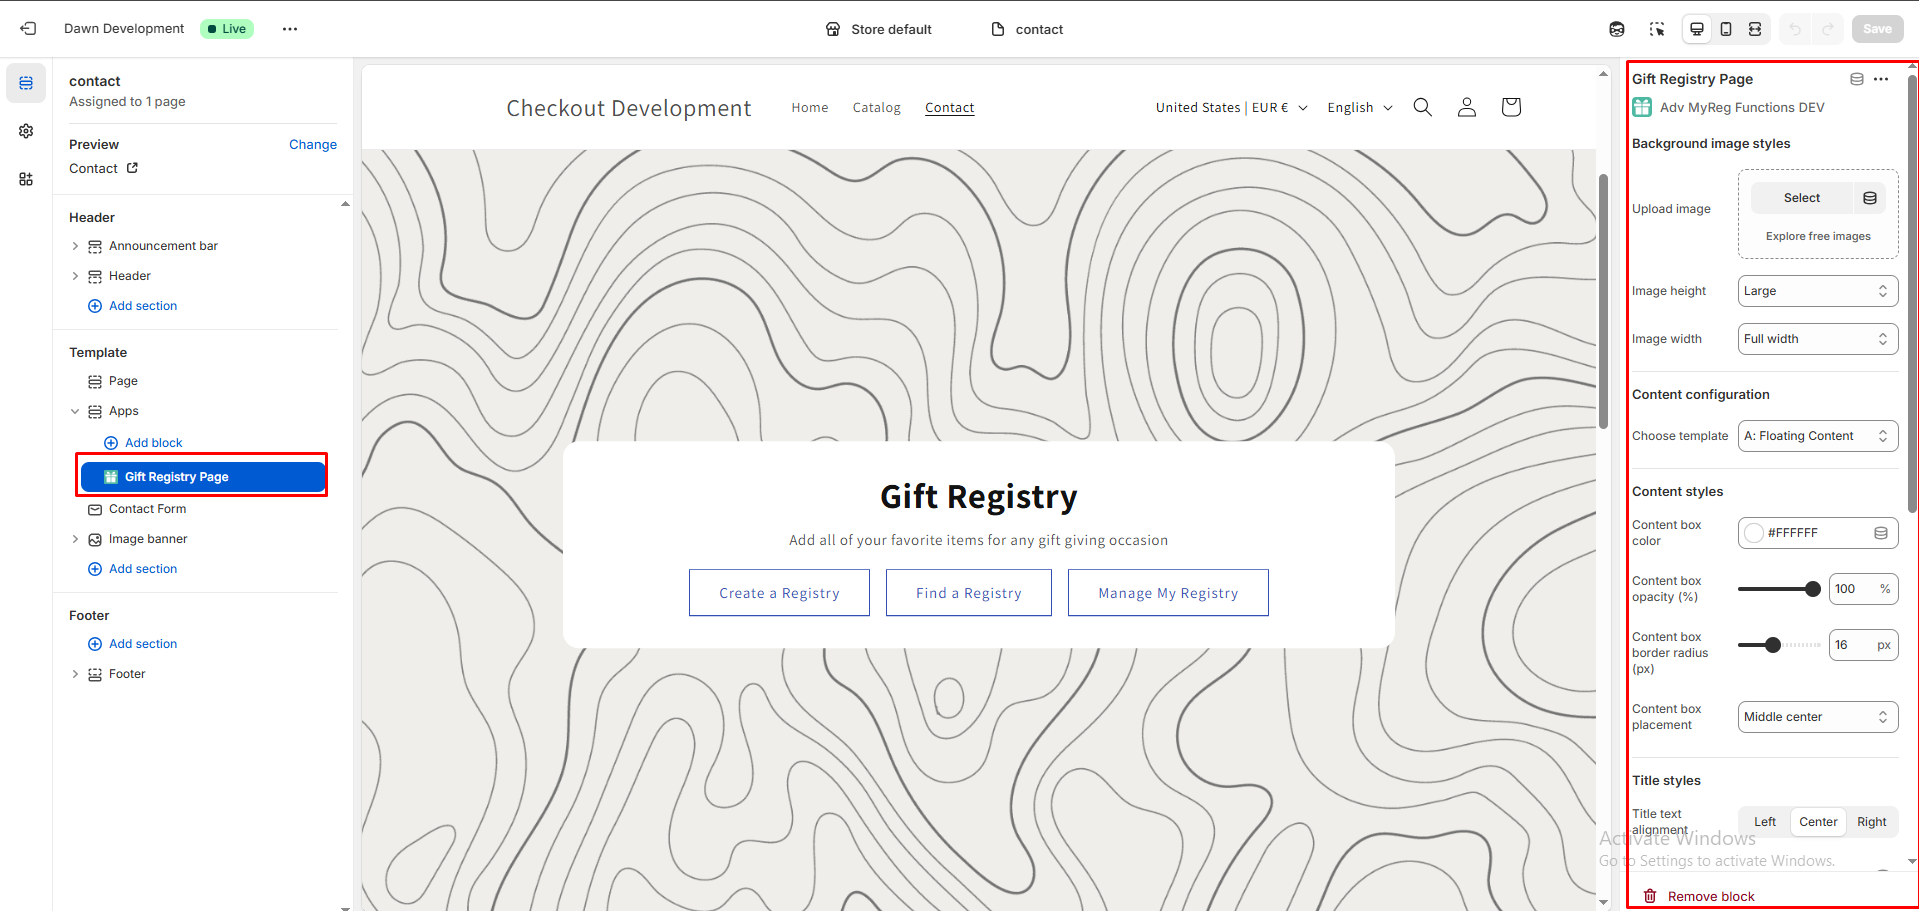
Once the Gift Registry Page has been successfully added, you can customize the look and feel of the button to match your store's branding
Customize Landing Page
Customize its appearance and layout to match your store’s branding. The customization panel of the theme editor provides the following options:
Background Image Styles, Content Configuration, Content Styles, Title Styles, etc
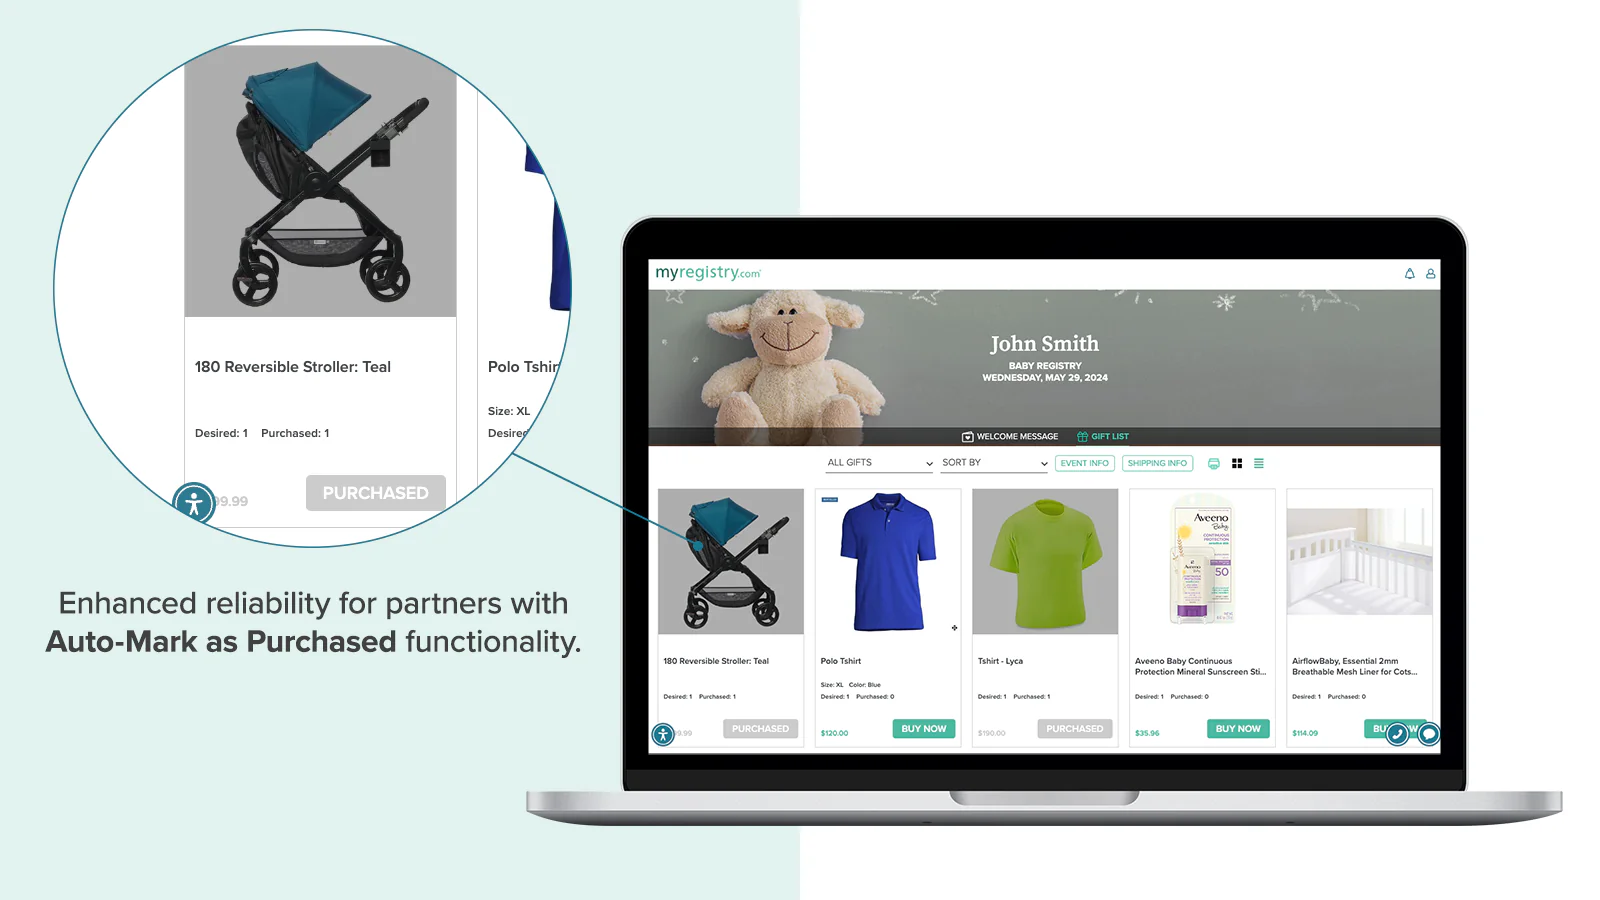
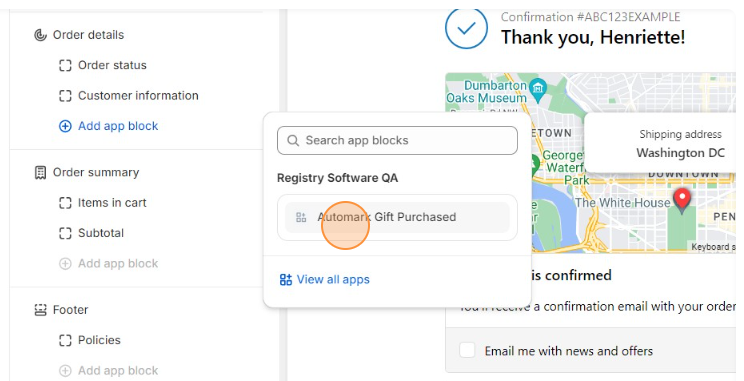
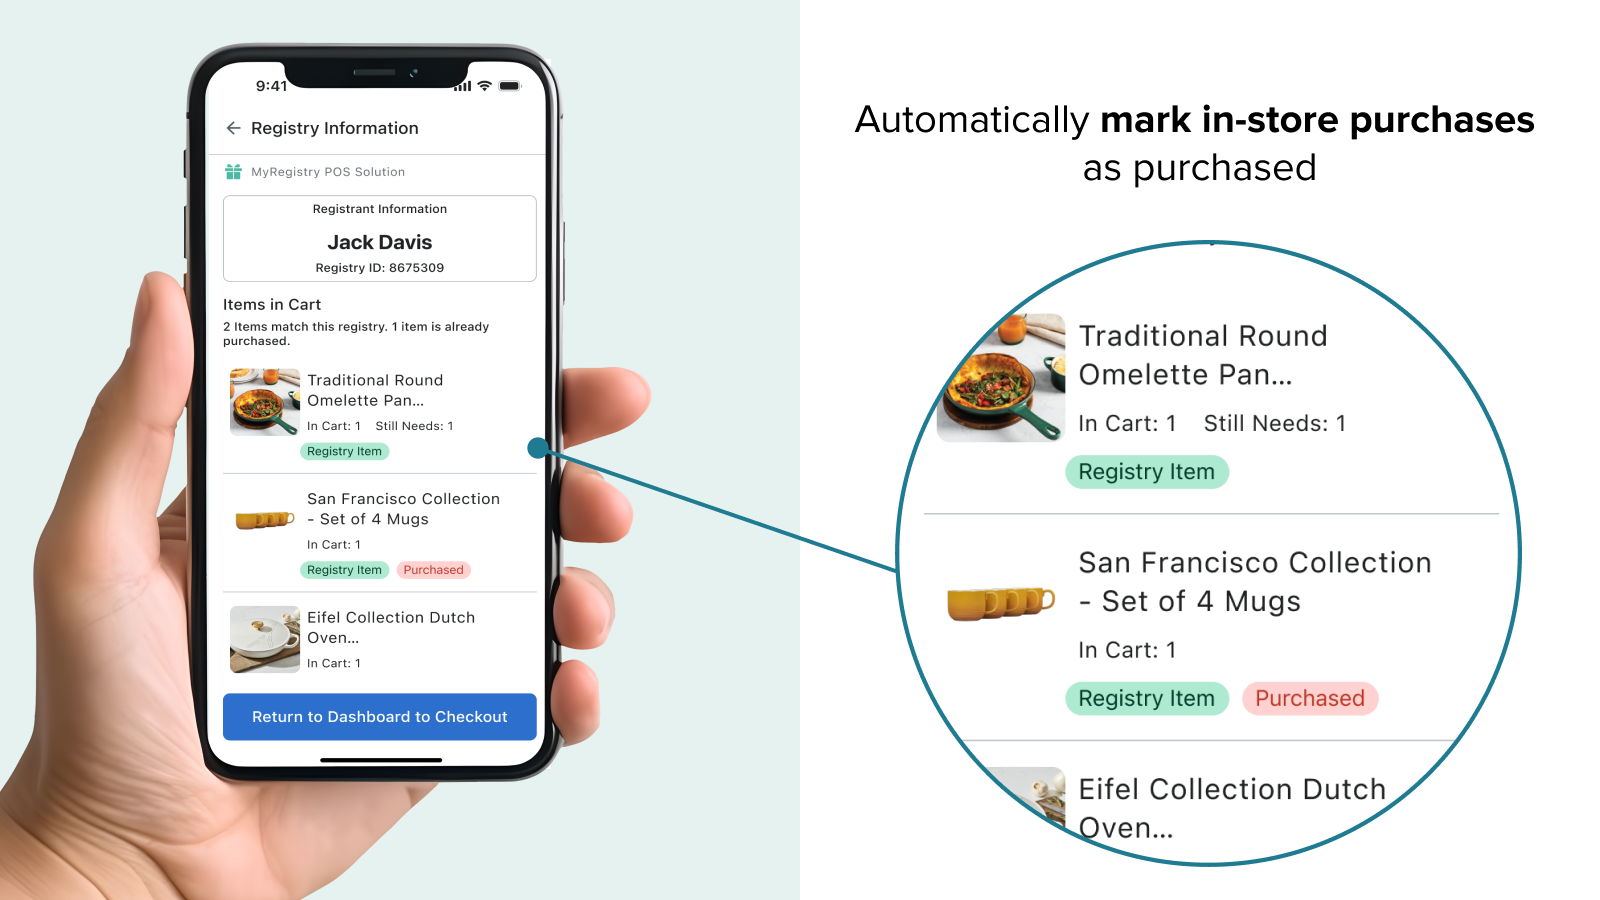
Automark as Purchased
Automatically mark gift items as "Purchased" on the MyRegistry.com gift list after a successful Shopify transaction
Steps to add Automark as Purchased

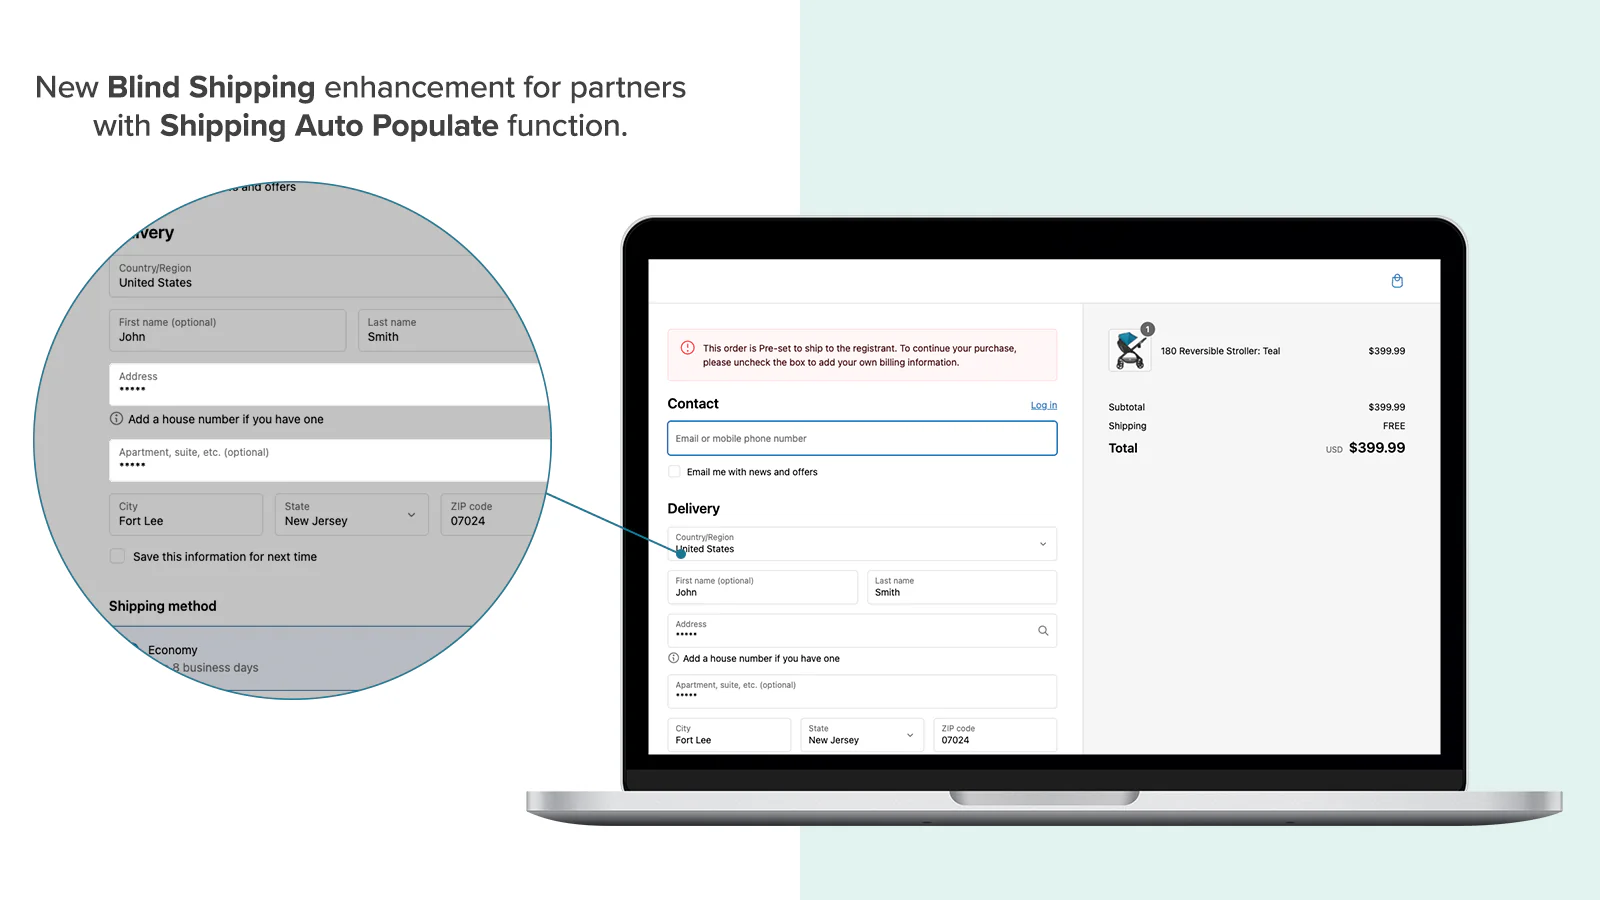
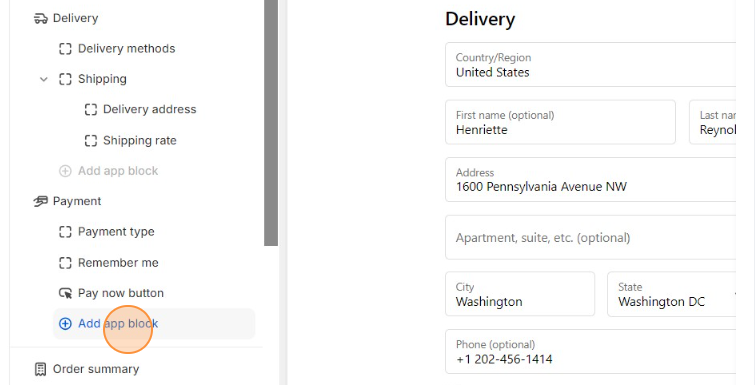
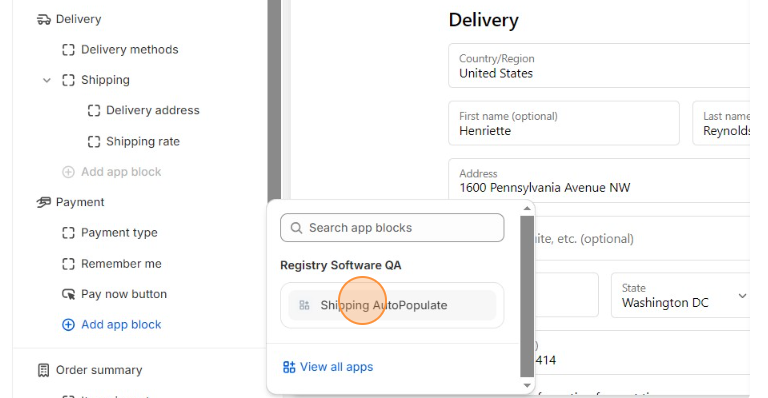
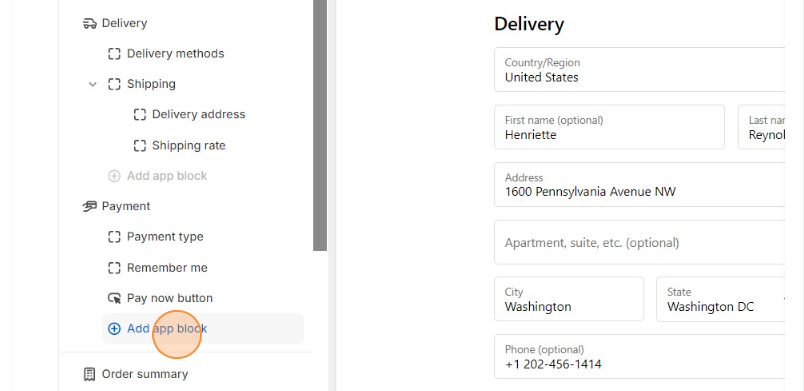
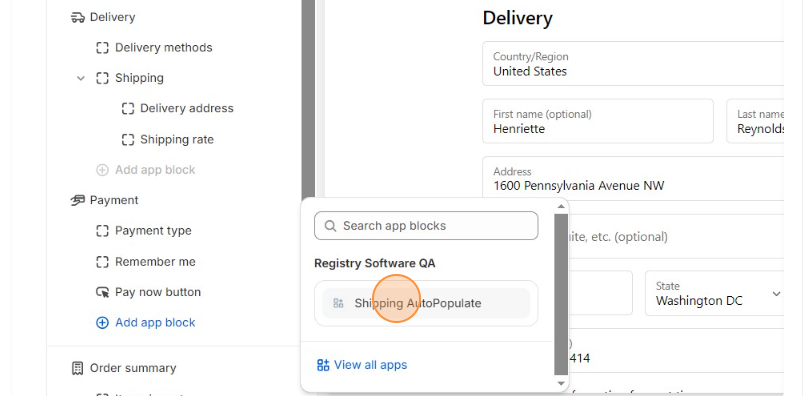
Shipping Auto-Populate
Automatically fill in the shipping address from the customer's MyRegistry.com account during Shopify checkout
This is an extension, compatible only for Partners enrolled in Shopify Plus plans
For Example: when customers select a gift from their MyRegistry gift list, this feature ensures that their pre-stored shipping details are accurately applied, streamlining the purchase experience.
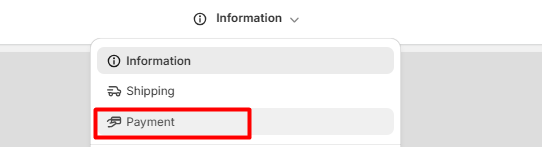
This feature can be set up based on the preferred checkout layout of the store
- To check the selected checkout
Go To Settings👉Checkout👉Customize - Select Settings from the left panel and scroll down to
Checkout layoutsection
Setup One Step Checkout

Setup Three Steps Checkout

MyRegistry POS
Enable MyRegistry features directly within your Shopify Point of Sale experience
Steps to configure MyRegistry POS feature
MyRegistry POS extension in your Shopify store automaticallys marks in-store purchases as purchased
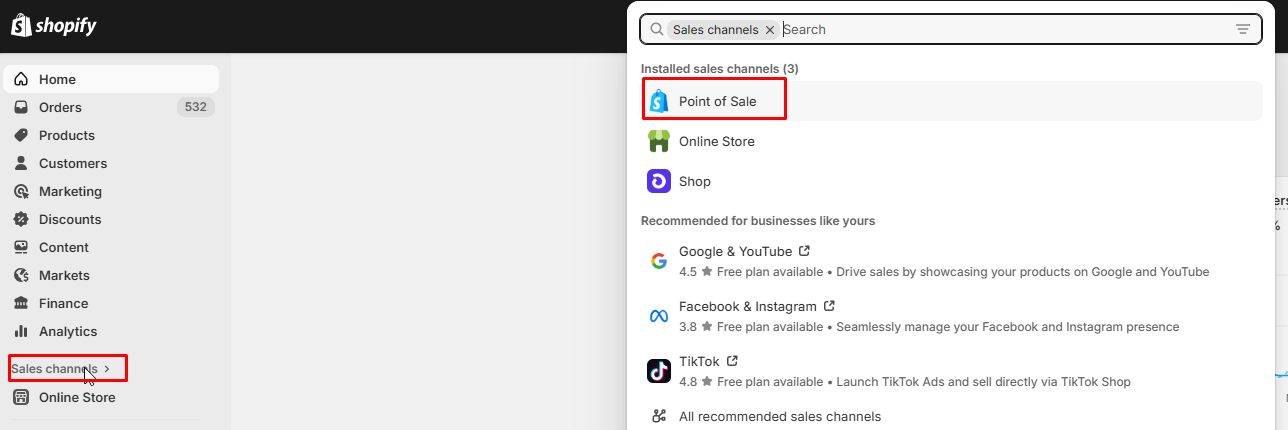
Inside Shopify admin panel
- In your Shopify admin, go to
Sales Channels👉Point of Sale
- Click on
Point of SaleSettings from the POS overview page
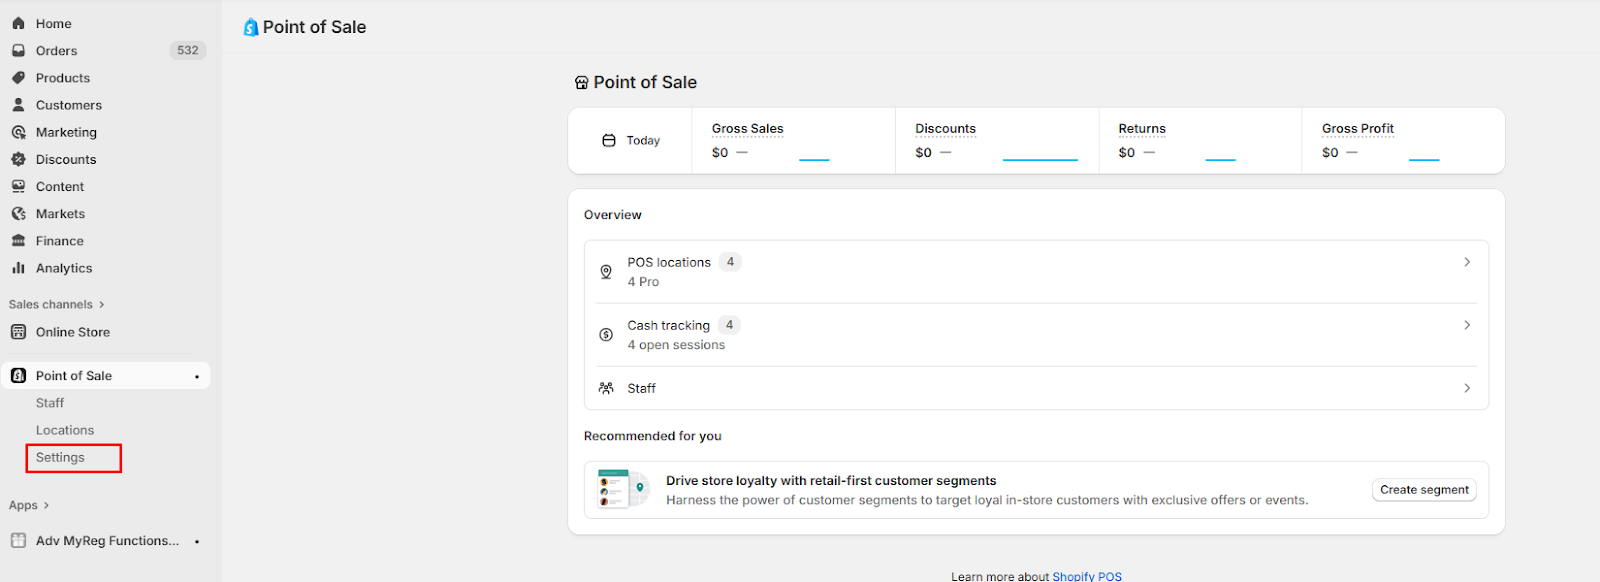
- Scroll down and select
POS Appsto view available app extensions
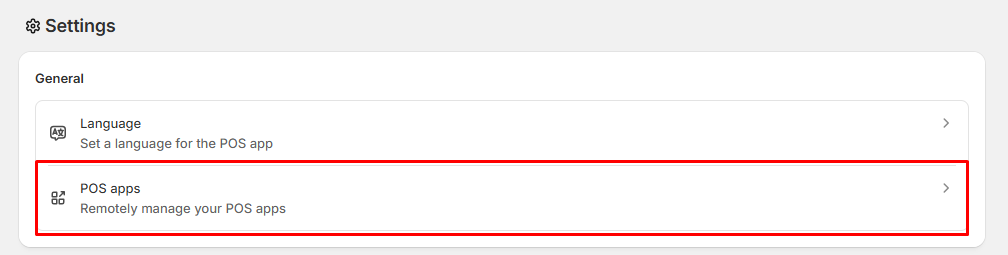
- Locate and click on
MyRegistry POS Solutionto manage its configuration

- Enable both available extensions:
- Smart Grid Tile – Adds the Gift Properties option directly within the POS cart
- Additional Areas (Order Confirmation) – Adds registry-related data to the order confirmation flow

- Click
Save
Sync with Shopify
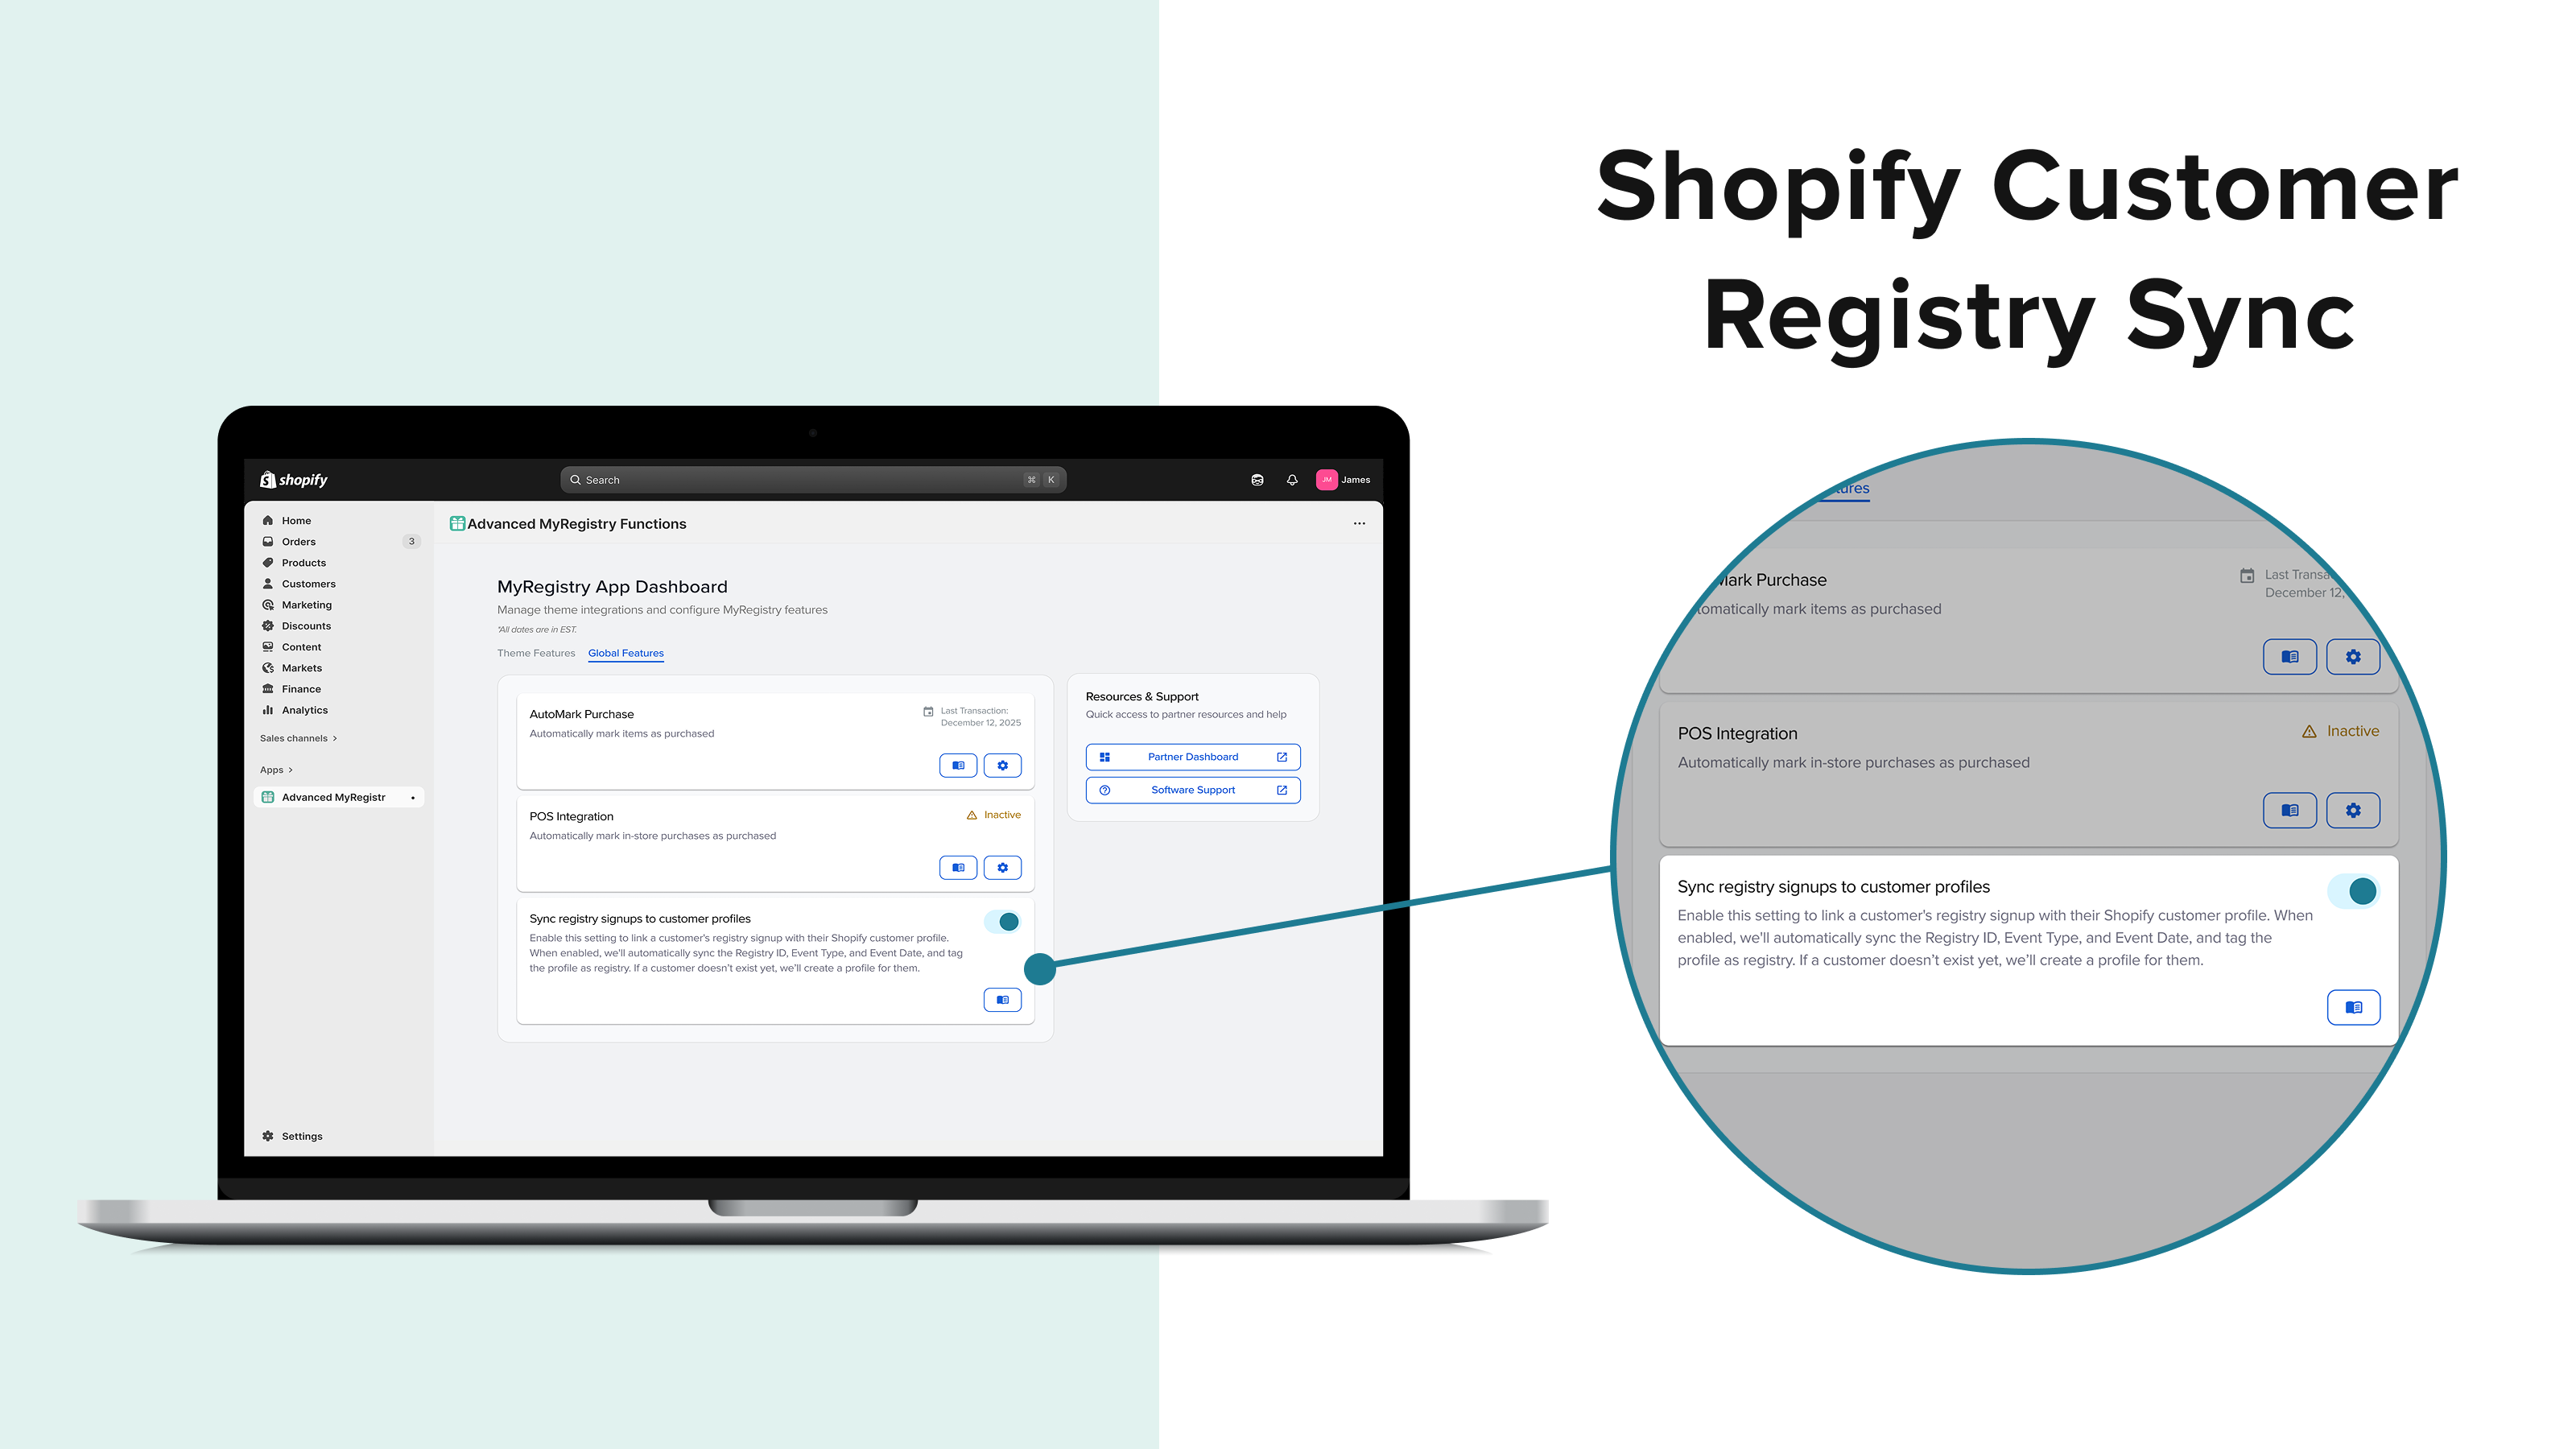
Links a MyRegistry registry signup directly to a Shopify customer profile. When enabled, the Registry ID, Event Type, and Event Date are automatically synced to the customer's Shopify profile. If no matching customer exists, a new profile is created.
One CRM at a time Only one CRM integration can be active per merchant. Enabling Shopify will automatically deactivate any previously configured CRM integration (e.g., Klaviyo, Listrak).
Steps to enable Sync with Shopify
Inside Shopify admin panel
- Go To the
Advanced MyRegistry Functionsapp and Navigate to Global Features
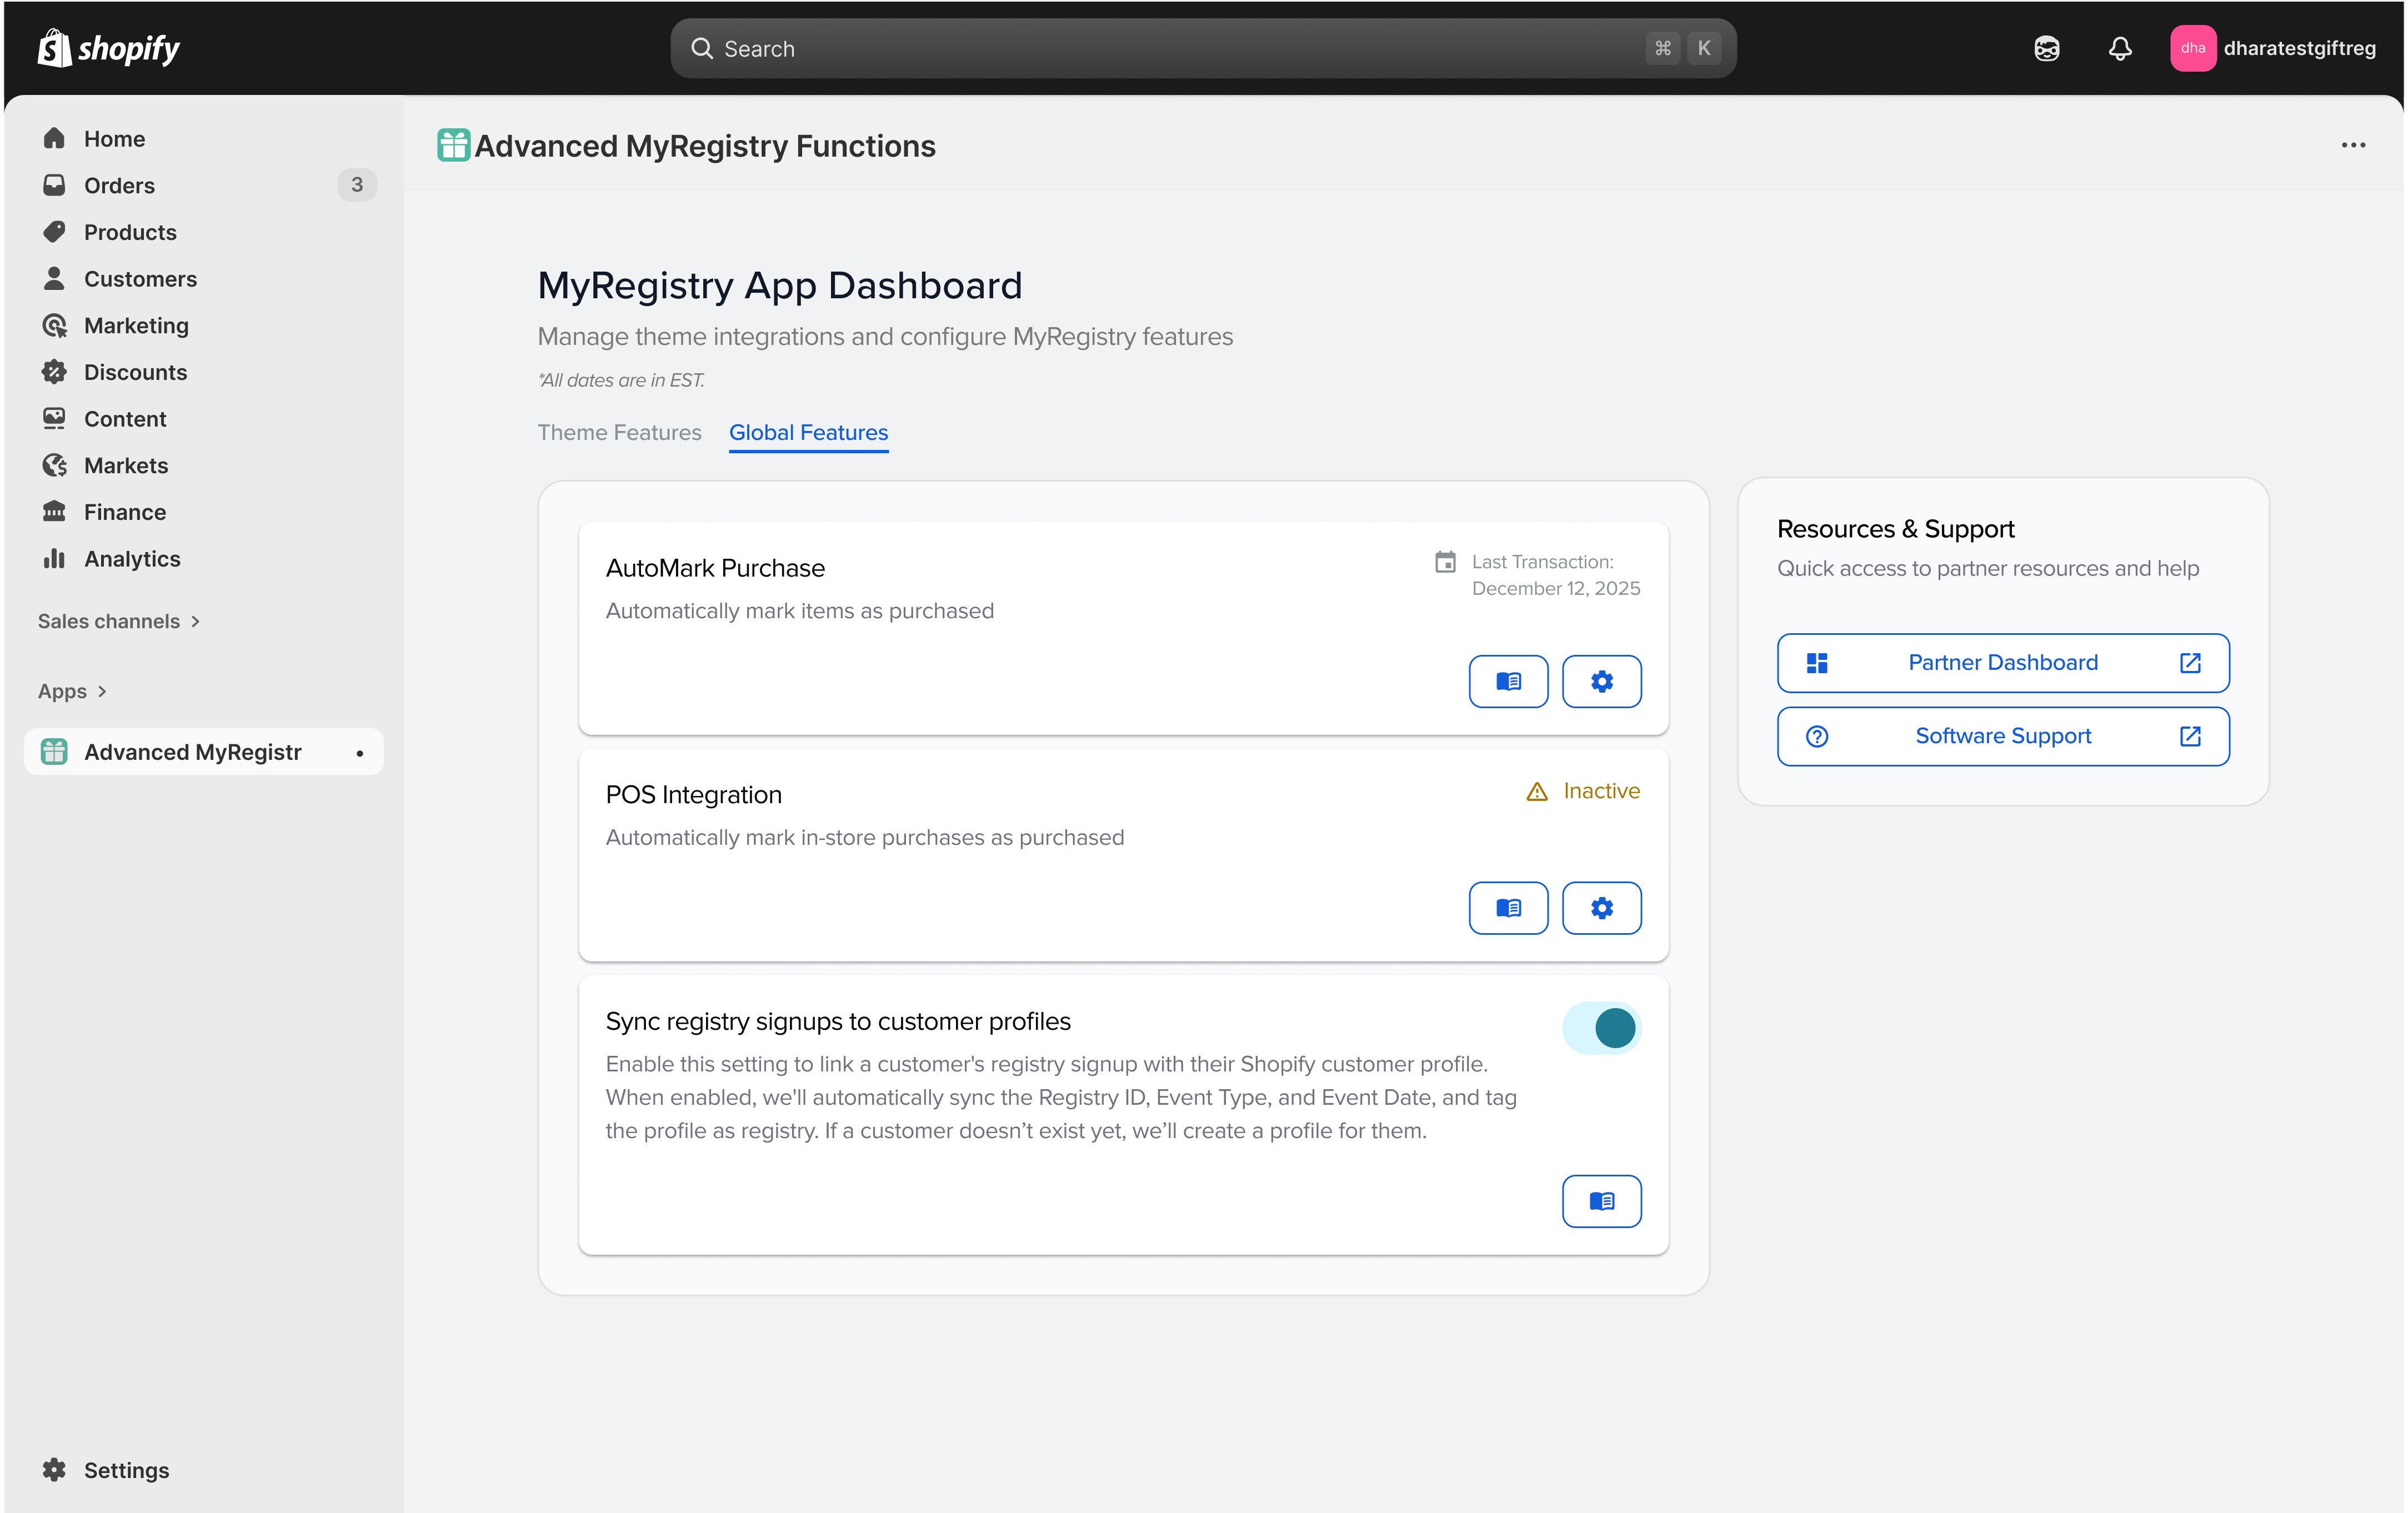
-
Locate
Sync registry signups to customer profiles -
Toggle the switch to ON.
Notes
- The integration syncs Registry ID, Event Type & Event Date to the Shopify customer profile.
- If the registry customer does not exist in Shopify, a new customer profile is created automatically.
- Settings are preserved when toggled OFF and can be re-enabled at any time.
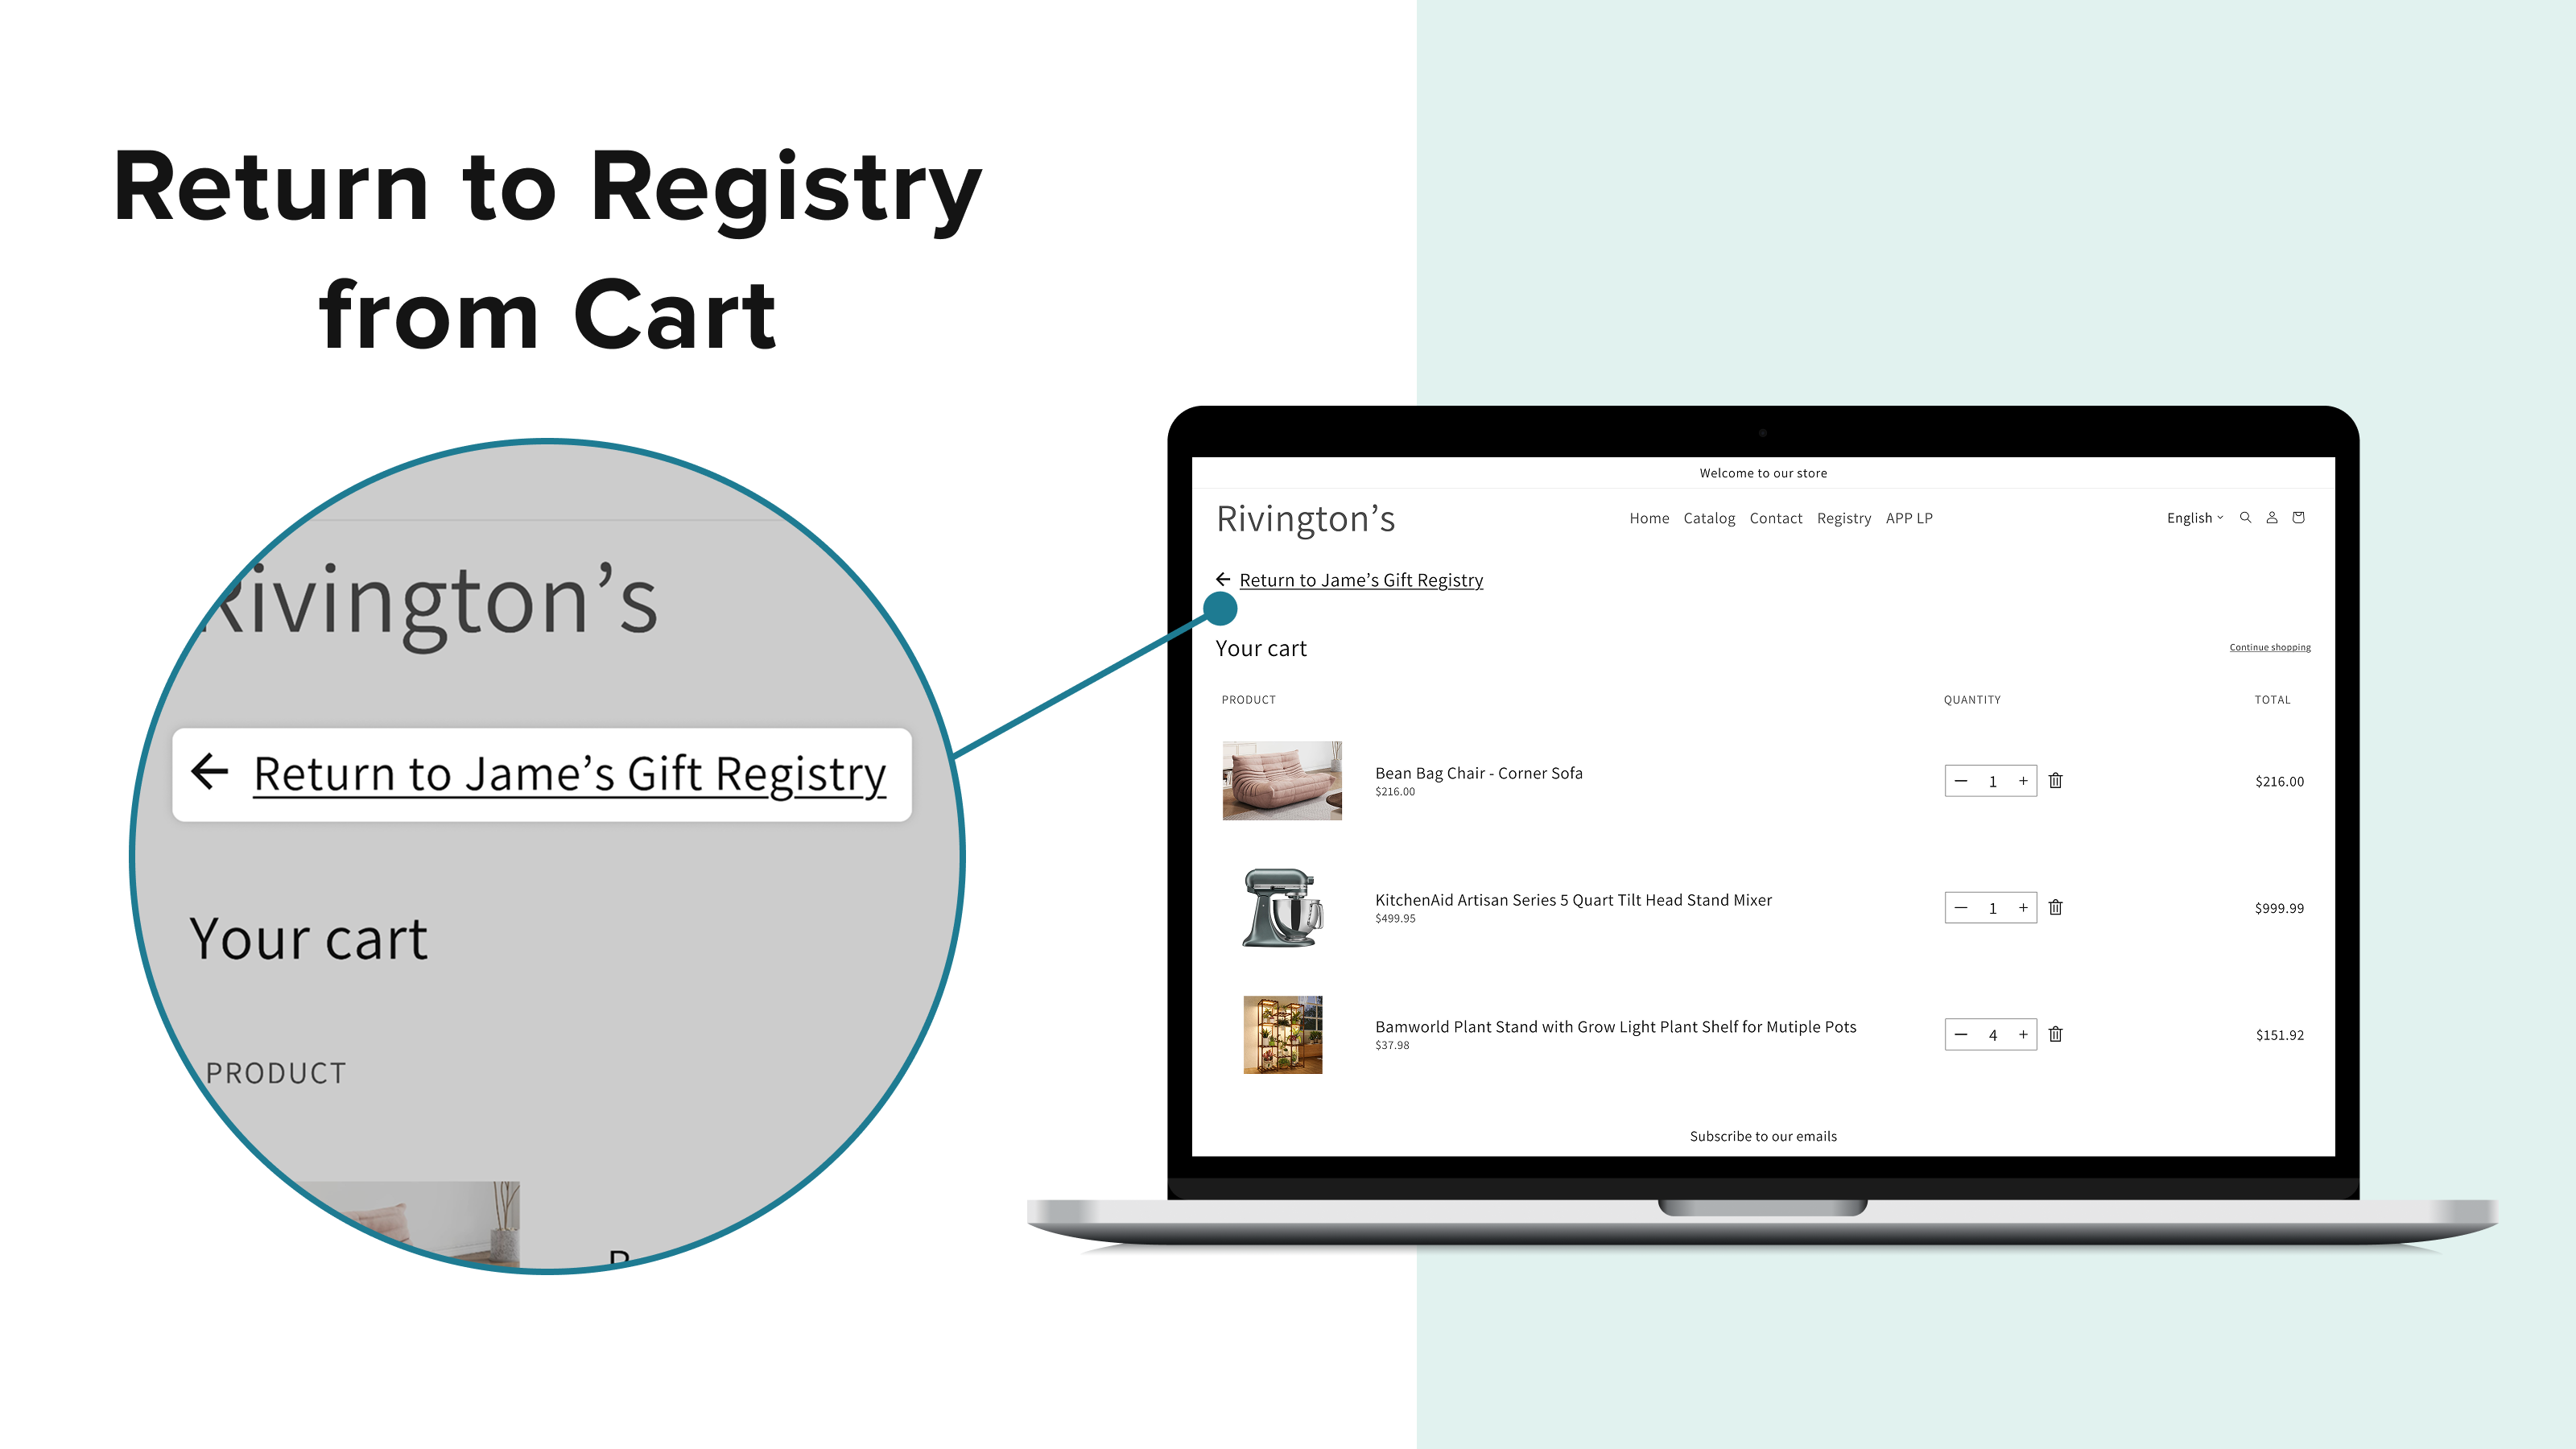
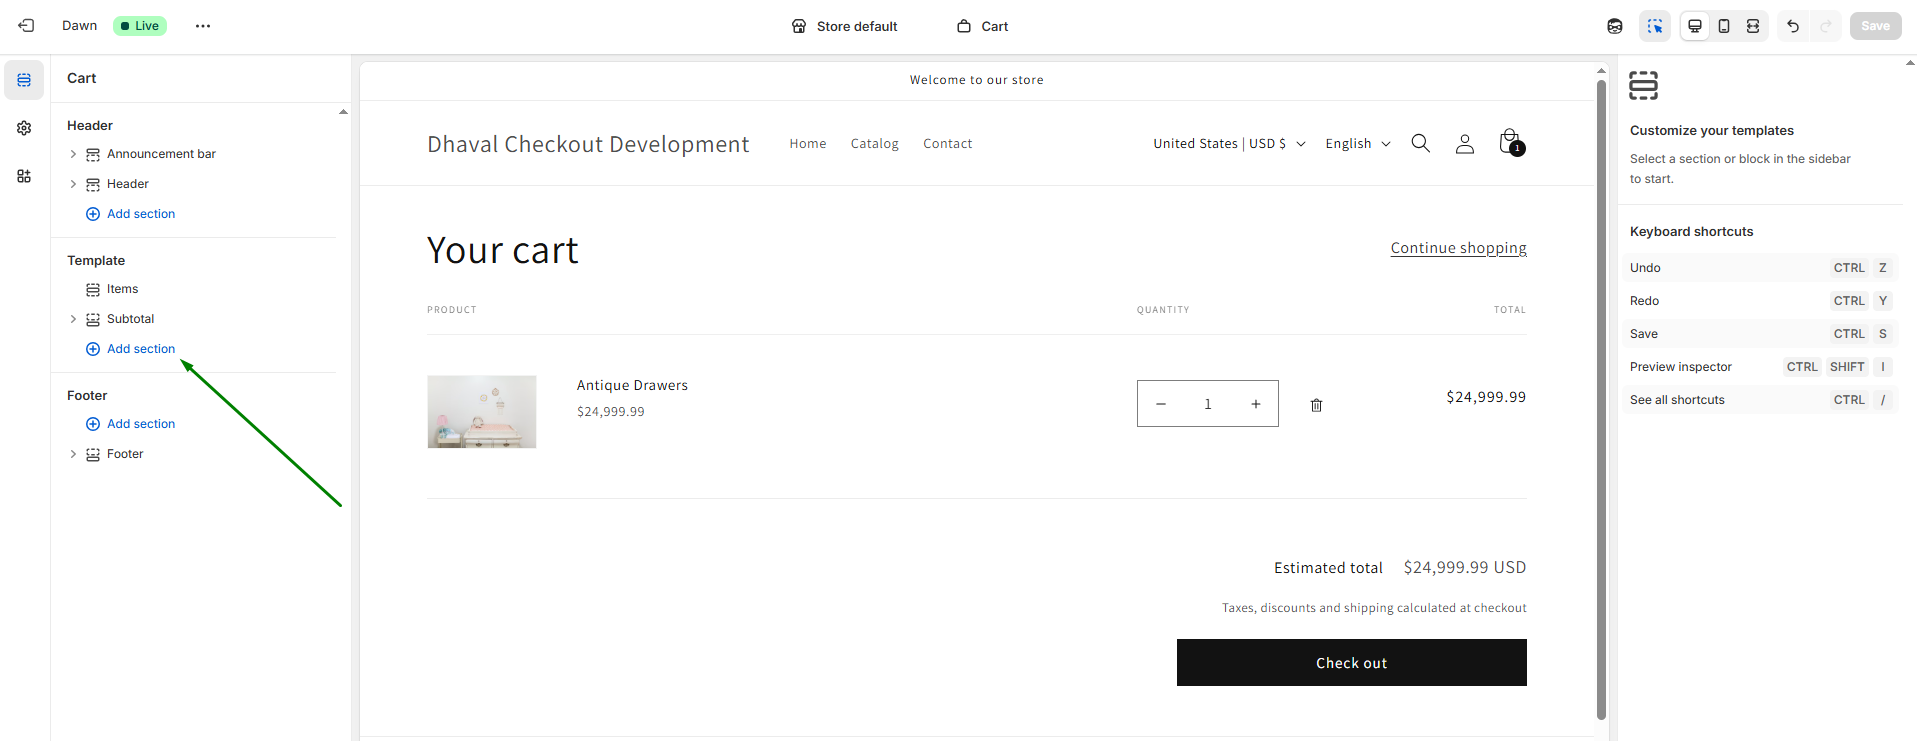
Return to Registry Link
Displays a Return to Registry link on the Shopify cart page when registry-sourced items are present. Gift shoppers can navigate back to the originating registry without losing their place in the gifting flow.
This feature applies to the cart page only. It is not supported in mini carts, cart drawers, or checkout.
Steps to add Return to Registry Link

Customize the Link
Configure placement via the Advanced Settings panel in the app block:
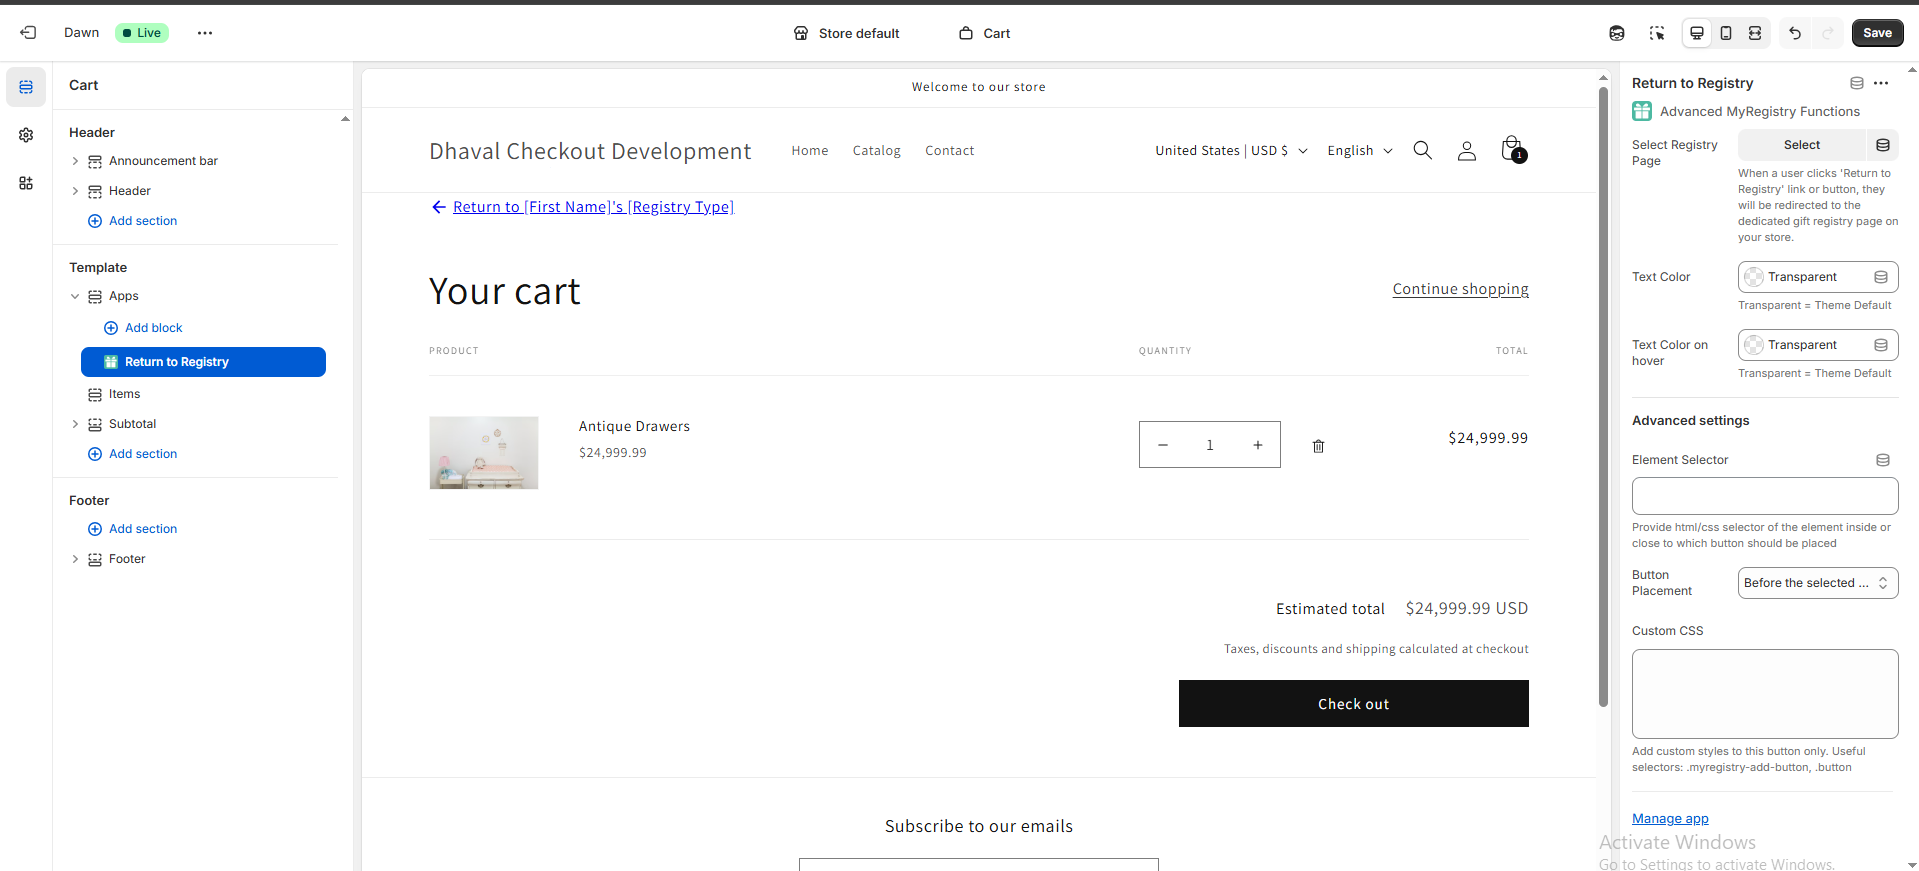
| Setting | Description |
|---|---|
| Element Selector | HTML/CSS selector of the element inside or adjacent to which the button should be placed |
| Button Placement | Position relative to the selected element: Before, After, or Inside |
If no selector is specified, the block renders above the cart line items by default
Styling Options
| Settings | Description |
|---|---|
| Text Color | Link text color. Transparent = Theme Default |
| Text Color on Hover | Text color on hover state. Transparent = Theme Default |
| Custom CSS | Custom styles scoped to this block only. Useful selectors: .myregistry-add-button, .button |
Registry Page Setting
If your store uses a custom registry page instead of the default /registry-page path, use the Select Registry Page setting in the block to specify the correct page.
When a shopper clicks the Return to Registry link, they are redirected to that page on your store
Link Label
The link label is dynamically generated from the registrant's name and registry type.
| Scenario | Label |
|---|---|
| Single registrant | Return to Ashley's Baby Registry |
| Co-registrant | Return to Ashley and John's Baby Registry |
| Name or type unavailable | Return to [First Name]'s [Registry Type] |
The fallback label displays when registry data cannot be resolved (e.g., in theme preview/edit mode)
Display Behavior
- Link renders only when at least one cart item contains registry metadata
- Supported in mixed carts - registry and non-registry items can coexist
- One registry per cart - only the originating registry is linked
- Link is automatically hidden if all registry items are removed from the cart
- If the cart is restored by Shopify, the link remains visible as long as registry items persist
- If the associated registry is deleted, expired, or disabled, the link is hidden or routes to a safe fallback